Starting Application Development
This section provides information about getting started developing your application, including details about the application development process, what's included in your PDK, and starting a project in the Xcode and Visual Studio IDEs.
In this section:
- Application Development Process
- What's in the PDK
- Starting a Project in Xcode
- Starting a Project in Visual Studio
Application Development Process
The following steps are recommended for developing and distributing your application:
-
Become familiar with what's included in your downloaded PDK. See What's in the PDK (below).
-
Start your application in Xcode, Visual Studio, or your preferred IDE. See Starting a Project in Xcode and Starting a Project in Visual Studio (below).
-
Code your application using the guidelines in Plug-in Development Basics.
-
Build and test your app in your IDE on the desktop. Note: This step is optional--you could just build for the device on your host PC and test on the device.
-
Compile and link your application for the device. See Building Your Application for the Device.
-
Package and test your application on the device using PDK command-line tools. See Creating an Application Package.
-
Repeat steps 3-6 until your app is ready for publishing.
-
Go to the Palm Development Center and upload your app's package file (
.ipkextension) for distribution to the Palm user community.
What's in the PDK
After you download the PDK, your installation directory, in Windows Explorer, is going to look like this (Mac users can see the equivalent on their machine using Finder under /opt ).
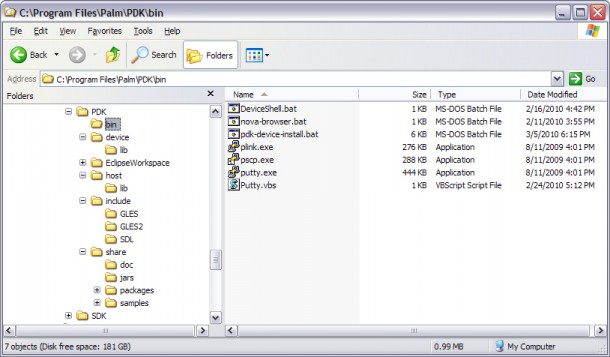
- bin— Utilities for building your app for the device ( nova-browser, putty, pscp ) and other miscellaneous tools.
Note:
The /bin directory is added to the system PATH during installation.
-
device--Libraries to use when you are linking for the device. See Building Your Application for the Device.
-
EclipseWorkspace--Example Eclipse workspace you can use for GDB debugging on the device. See Using Eclipse as a Front-End to GDB Debugging on the Device.
-
host--Libraries to use when you are testing your app on the desktop. See Starting a Project in Xcode and Starting a Project in Visual Studio.
-
include--C header files for DGLES (Desktop OpenGL ES), SDL (Simple DirectMedia Layer), PDL (Palm Development Library) and SDL cinema.
-
share--Source code examples to help you get started and that are used to illustrate procedures and app development issues discussed in this documentation.
On Windows, you have a number of GUI menu items available for tools and links, see Start > All Programs > Palm > WebOS PDK.
Starting a Project in Xcode
On Mac machines, the Palm PDK comes with an Xcode Palm application project template. This template is pre-configured with the location of header files and libraries for building your application. You just need to add your own source code files and your application is ready to be built, linked and run.
Note:
Currently, Xcode can only be used for running apps on the desktop, not the device itself.
To use the Palm project template in Xcode:
-
Launch Xcode.
-
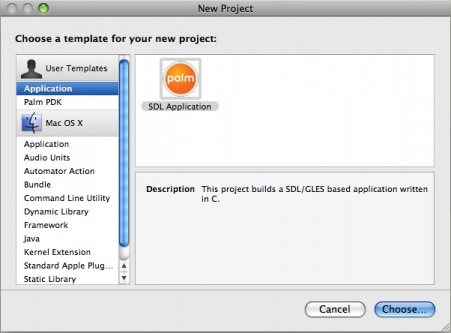
Select File > New Project. The following dialog box appears:
-
Select SDL Application and click Choose.
-
To see what this template provides, select Project > Edit Project Settings. The following entries are configured:
- Other Linker Flags— Points to SDL and GL ES libraries for linking.
- Header Search Paths— Points to SDL and PDK header files for compilation.
- Library Search Paths— Points to PDK libraries for linking.
Note:
A discussion of SDL, OpenGL and graphics programming is beyond the scope of this document, but you can look online for information related to these topics and you can also look at the simple project for ideas on starting your app--/opt/PalmPDK/share/samplecode/simple/.
Starting a Project in Visual Studio
The easiest way to start a project in Visual Studio is to clone the simple sample application you can find at C:\Program Files\HP webOS\PDK\share\samples\simple\.
To clone the simple application:
-
In Windows Explorer, create a new folder for your project, e.g.,
C:\PalmApps\clone. -
Go to
C:\Program Files\HP webOS\PDK\share\samples\simple\. -
Copy all the files from the simple directory to the clone directory.
-
Launch Visual Studio.
-
Open the simple solution file (
simple.sln) in theclone\windowsdirectory. -
In Solution Explorer (on the right), rename the solution, project, and C files.
Notes:
If you did not run the sample app as described in Running the sample application in Visual Studio (desktop), then you will need to do the Visual Studio configurations described there for your cloned project so your app can run on the desktop. These configurations point to the header files and libraries Visual Studio needs for compiling and running your app on the desktop.
The build scripts (.cmd files) you copy over from the simple directory need to be modified for your new project if you want to use them.