The Basics: Scenes
This document contains the following sections:
- Recommended Reading
- Overview
- Designing Scenes
- Behind the Scenes
- Related Topics
Recommended Reading
We recommend that you read the following documents before going forward:
And of course the O'Reilly® book Palm webOS, by Mitch Allen, is an excellent resource, too! Take a peek at the first chapter, which introduces you to the webOS operating system and the HP webOS Software Developer Kit (SDK), which the SDK documentation commonly refers to as Mojo or the framework.
Overview
This document is geared toward the beginning webOS developer. Here we discuss the basic concept of scenes--what they are, what you can do with them, how they work, and how to create them.
Let's expand on some of the definitions found in the "Recommended Reading" documents:
Scenes--It is the scene that the user sees and interacts with to perform a single task or a group of related tasks. Each scene has a scene assistant file and a main HTML view file, and may have optional template HTML view files.
Scene assistants--An assistant is a set of JavaScript functions that use controllers provided by Mojo to customize behavior. There is one assistant for each scene.
Scene controllers--There is a scene controller for each scene assistant. Each scene controller manages its scene's objects and elements. It also controls the pushing and popping of scenes.
Push--Pushing (activating) a scene places it at the top of the stage's scene stack, where it becomes visible to the user. Activation may result from user action on the previous scene or from pre-defined application events (such as notifications).
Pop--Popping (deactivating) a scene removes it from the stage. Deactivation of a scene typically results from user action on that scene, such as tapping a button.
Scene stacks--As multiple scenes are pushed onto a stage, a "scene stack" is created. Each stage manages its own scene stack. The last pushed (activated) scene is visible to the user and is, therefore, at the top of the scene stack. Popped scenes do not remain in the scene stack. To reappear on the scene stack, the scene must be pushed again.
Transitions--There are a few standard transitions, or visual effects, that occur after the user makes a gesture on the touchscreen that moves from one scene to another. For more info, see User Interface Summary and Mojo.Transition.
Gestures--Gestures are specific finger movements on the device's touchscreen for navigating from one scene to the next, and back. For more info, see User Interface Summary.
Events--An event is usually an action (gesture) made by the user on the touchscreen, such as tapping a button, that is processed by the application code. The Mojo event model is similar to the World Wide Web Consortium (W3C) HTML event model.
Note: You can find these and other terms from this document defined in the Glossary.
Designing Scenes
This section briefly discusses the use of styles and widgets that make an application's scenes both attractive and user-friendly.
Styles
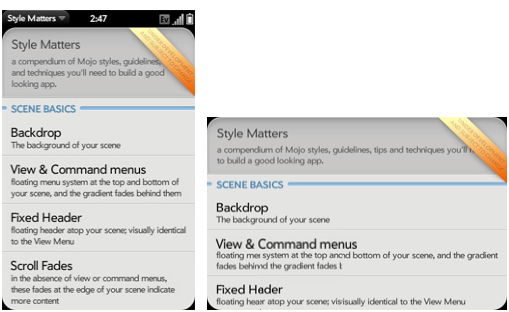
Mojo provides base (default) styles for scenes and all of the widgets, which you can play with in the Style Matters application provided with the SDK. Base styles are automatically applied when you provide the Mojo class names in the HTML or use Mojo widgets. If you do not want to use a widget's base style, you can override the style or create a new one in the CSS file. However, the use of base styles makes an application feel like a native webOS application, which speeds up the learning process for users.
A full discussion about styles is outside the scope of this document, but some of the important style features include:
-
Screen orientation--With Mojo, you can design applications so they operate in both the portrait (default) and landscape views, where appropriate.
-
Light and dark styles--The default is the light style (
palm-light), which uses a light background with dark text and controls. The dark style (palm-dark) uses a dark background with light text and controls. To use the dark style, add thepalm-darkclass name to the<body>element or to the individual elements on a page.
For more info, see Style Matters. Also, the Palm webOS book has an entire chapter devoted to advanced styles.
Widgets
Mojo widgets contribute greatly to the look and feel of scenes. There is a wide range of these dynamic UI controls, such as various buttons, controls, lists, text fields, and so on. After deciding which widgets to use for a scene, you need to declare, configure, and set up the widgets.
Declaring the Widgets
Declare the widgets in the scene's HTML view file in an empty <div> tag by using the x-mojo-element attribute.
Example:
<div id = "my-toggle" x-mojo-element = "ToggleButton"></div>
Configuring and Setting Up Widgets
Configure and set up the widget by using the scene assistant's setup method to call the scene controller's method setupWidget().
Example:
var toggleAttr = {trueValue: "on", trueLabel: "On",
  falseValue: "off", falseLabel: "Off"};
this.toggleModel = {value: "on", disabled: false};
this.controller.setupWidget("my-toggle", toggleAttr, this.toggleModel);
The call to setupWidget() requires three arguments:
-
Widget ID or name--We recommend using the
nameattribute instead ofidif declaring the widget in a template for a list item, or if the scene might be pushed several times without being popped. -
Attributes--Attributes affect the behavior and display of the widget. You cannot change attributes after instantiating them.
-
Model--The data model object is the user data shown by the widget. Changing a widget model outside of the widget does not automatically update the widget. For this to occur, the scene assistant must call the
modelChange()method on the widget's scene controller to pass the changed model object.
For more info about widgets, see User Interface Summary and Widgets.
Behind the Scenes
This section briefly discusses the required nomenclature, file operating sequence, pushing and popping scenes, and the use of events.
Nomenclature
As you learned in Application Structure, the palm-generate tool gives you a standard application structure with pre-defined directories and files. You can add other directories and files as you build your application.
There are a few name requirements for scene files and functions. The scene assistant's name must match the view name, optional template view name, and the function defined for the assistant. And this function name should start with a capital letter. For example, if the scene name is birthday, you should have:
-
birthday-assistant.js, the scene assistant -
birthday-scene.html, the scene view file -
birthdayTemplate.html, an optional template scene view file -
BirthdayAssistant(), the scene assistant's function name
File Operating Sequence
Applications built with webOS have a specific order for launching their files, as shown in the following figure. The framework uses file naming conventions to know which assistant file and view file specified in sources.json work together to push a scene.
In addition to this basic method to push scenes, there is the Commander Chain, which incorporates another type of stage and scene controllers.
For more info, see Application Launch Cycle and Commander Chain.

File Launch Sequence
Pushing and Popping Scenes
Mojo has several methods available for pushing and popping application scenes. The following table summarizes the more common methods.
| Method | Description |
pushScene(sceneArguments)
|
Pushes a new scene. Passes in the optional sceneArguments.
|
popScene(returnValue)
|
Removes a scene from the scene stack. Passes returnValue to the next scene's activate method.
|
popScenesTo(targetScene, returnValue)
|
Removes scenes from the scene stack to reach the targetScene or the stack becomes empty. Passes returnValue to the next scene's activate method.
|
swapScene(sceneArguments)
|
Pops the active scene and swaps (pushes) it with a new scene that is not in the scene stack. Passes in the optional sceneArguments.
|
topScene()
|
Returns the top scene from the stage. |
getScenes()
|
Returns an array of scene controllers on the stack. |
activateScene()
|
Returns the current active scene from the stage, if applicable. |
To push a scene, update sources.json with the file path to the scene and the scene name, and update the stage assistant file with a call to one of the StageController push methods.
To pop a scene, make calls to the scene controller's and scene assistant's deactivate methods, followed by calls to their cleanup methods. For more info, see Application Launch Cycle and the Mojo.Controller.StageController API.
Events
Building a scene to accept events (from the application or user) requires the use of event listeners, event handlers, and the correct scene transitions. These topics are outside the scope of this document. For more info, see Events and Event Handler Tips.
Related Topics
Other related topics include:
- Command Line Tools
- Scene Hierarchies in webOS Applications
- Build Your First App
The next document in this series is about Tools.