Lists
VirtualList
A VirtualList is a control that displays a scrolling list of rows, suitable for displaying very large lists. VirtualList is optimized such that only a small portion of the list is rendered at a given time. A flyweight strategy is employed to render one set of list row controls as needed for as many rows as are contained in the list.
Note: Because a VirtualList contains a Scroller, it must have a fixed display size. If a list with variable display height is required, use a VirtualRepeater.
Basic Use
The components block of a VirtualList contains the controls to be used for a single row. This set of controls will be rendered once for each row.
The onSetupRow event allows for customization of row rendering. Here's a simple example:
components: [
  {kind: "VirtualList", style: "width: 500px; height: 200px;",
      onSetupRow: "setupRow", components: [
          {kind: "Item", layoutKind: "HFlexLayout", components: [
              {name: "caption", flex: 1},
              {kind: "Button", onclick: "buttonClick"}
          ]}
      ]
  }
],
setupRow: function(inSender, inIndex) {
  if (inIndex < 100) {
      this.$.caption.setContent("I am item: " + inIndex);
      this.$.button.setCaption("Button" + inIndex);
      return true;
  }
}
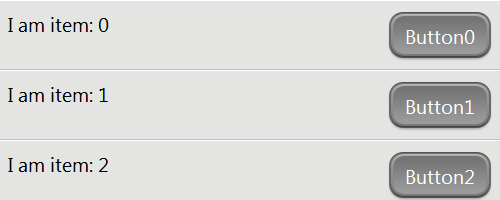
In this example, the control of kind "Item" is rendered once for each row. When a row is rendered, the onSetupRow event is fired with the row index as the second parameter. The setupRow method sets properties on controls in the row to customize the rendering of the row. Notice that it returns true if the index is less than 100. An onSetupRow handler must return true to indicate that the given row should be rendered. If it does not, the list will stop rendering.
Continuing with our example, we'll give the button an onclick handler. As previously noted, the button is rendered once for each of the 100 list rows. The onclick handler will fire for a click on any of the row buttons. It is common to need to know the exact row on which a user clicked; events fired from within list rows contain this information in the rowIndex property of the DOM event object:
buttonClick: function(inSender, inEvent) {
  this.log("The user clicked on item number: " + inEvent.rowIndex);
}
Modifying List Rows
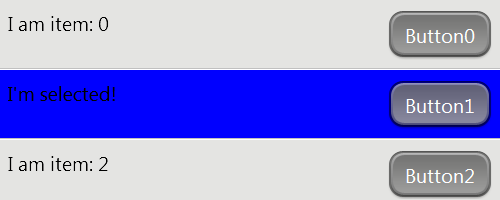
Sometimes a list row will need to be modified. For example, if a user clicks on a row, the application might want to indicate that the row has been selected by making a color change. In this case, a row item could have an onclick handler that stores the index of the selected row. The onSetupRow handler would use this information to decorate the selected row. To instruct the list to render, call the refresh method. Building on our previous example, here's how the color change could be implemented:
components: [
  {kind: "VirtualList", style: "width: 500px; height: 200px;",
      onSetupRow: "setupRow", components: [
          {kind: "Item", layoutKind: "HFlexLayout", onclick: "itemClick",
              components: [
                  {name: "caption", flex: 1},
                  {kind: "Button"}
              ]
          }
      ]
  }
],
setupRow: function(inSender, inIndex) {
  if (inIndex < 100) {
      // Check to see if the row is selected.
      var isRowSelected = (inIndex == this.selectedRow);
      // If the row is selected, set its background color to blue.
      if (isRowSelected) {
          this.$.item.applyStyle("background-color", "blue");
          this.$.caption.setContent("I'm selected!");
      } else {
          this.$.item.applyStyle("background-color", null);
          this.$.caption.setContent("I am item: " + inIndex);
      }
      this.$.button.setCaption("Button" + inIndex);
      return true;
  }
},
itemClick: function(inSender, inEvent) {
  this.selectedRow = inEvent.rowIndex;
  this.$.virtualList.refresh();
}
If you click Item 1, you should see the following:
Data Handling
It's common for an application to have a set of data that should be displayed as a list. Here's an example that uses an array of data to display list rows:
data: [
  {animal: "cat", greeting: "Meow"},
  {animal: "small dog", greeting: "Arf"},
  {animal: "big dog", greeting: "Woof"}
],
setupRow: function(inSender, inIndex) {
  var row = this.data[inIndex];
  if (row) {
      this.$.caption.setContent("Greet a " + row.animal + ":");
      this.$.button.setCaption(row.greeting);
      return true;
  }
}

Sometimes it isn't practical to gather all the data that needs to be rendered in a list, all at one time. VirtualList provides the onAcquirePage event to allow an application to perform work, such as retrieving data, when a section of the list needs to be rendered. The number of items VirtualList expects to be in each page is determined by the pageSize property.
For example, this service call could be made to acquire data for a page of list items:
{kind: "VirtualList", onAcquirePage: "acquireListPage",
  onSetupRow: "setupRow", components: [ <some components> ]}

acquireListPage: function(inSender, inPage) {
  var index = inPage * inSender.pageSize;
  // if we don't have data for this page...
  if (!this.data[index]) {
      // get it from a service
      this.$.service.call(
          {index: index},
          {index: index, onSuccess: "dataResponse"}
      )
  }
}
In this case, the data is not available until the service responds. We've passed the index of the data row to retrieve to the service request object, so we can use it to populate our data array when the service responds.
Again, when the list should be re-rendered, call the refresh method.
dataResponse: function(inSender, inResponse, inRequest) {
  // put the retrieved data into the application's store of data
  // (method omitted)
  this.storeData(inRequest.index, inResponse.results);
  //
  // prompt the list to render.
  this.$.list.refresh();
}
VirtualRepeater
A VirtualRepeater is a control that displays a repeating list of rows. It is suitable for displaying medium-sized lists, up to maximum of about 100 items. Because a VirtualRepeater does not include a Scroller, its display height is not fixed. In most other respects, however, a VirtualRepeater behaves much the same as a VirtualList.
For example, the components block of a VirtualRepeater (just like that of a VirtualList) contains the controls to be displayed for a single row. This set of controls is then rendered once for each row in the list.
As in VirtualList, the onSetupRow event in VirtualRepeater may be used to customize row rendering. Here's a simple example:
components: [
  {kind: "VirtualRepeater", onSetupRow: "setupRow", components: [
      {kind: "Item", layoutKind: "HFlexLayout", components: [
          {name: "caption", flex: 1},
          {kind: "Button", onclick: "buttonClick"}
      ]}
  ]}
],
setupRow: function(inSender, inIndex) {
  if (inIndex < 100) {
      this.$.caption.setContent("I am item: " + inIndex);
      this.$.button.setCaption("Button" + inIndex);
      return true;
  }
}
In this example, the control of kind "Item" is rendered once for each row. When a row is rendered, the onSetupRow event is fired with the row index as the second parameter. The setupRow method sets properties on controls in the row to customize the rendering of the row. Notice that it returns true if the index is less than 100. An onSetupRow handler must return true to indicate that the given row should be rendered. If it does not, the repeater will stop rendering.
Continuing with our example, if we give the button an onclick handler, the behavior will again match that of VirtualList. The onclick handler will fire for a click on any of the row buttons, and the index of the row that was clicked will be available as the rowIndex property of the DOM event object:
buttonClick: function(inSender, inEvent) {
  this.log("The user clicked on item number: " + inEvent.rowIndex);
}
Flyweight
A Flyweight is a control designed to be rendered multiple times. It is suitable for displaying small lists.
Typically, controls provide dynamic behavior in response to events and effect changes in rendering. Because flyweight is rendered multiple times, the question comes up: which rendering of the flyweight should update when an event occurs? To address this issue, whenever a DOM event is processed by a Flyweight object or any of its children, the flyweight automatically updates itself and its children to point to the rendering of itself in which the event occurred.